Group's posts with tag: accomodation
What are tags? You can give your posts a "tag", which is like a keyword. Tags help you find content which has something in common. You can assign as many tags as you wish to each post.
|  | Hi to all:
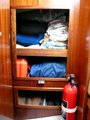
At Bram's request, I'm re-posting a couple of photos of the changes I've made to the original cupboard. All I've really done is to enlarge the opening and divide the space in two, the lower one being reserved for boots and shoes. The upper space has two shelves so that items like bedding, clothing, etc., can be stored in a more orderly fashion. The upper shelf can be removed to make space for bulkier items. All this has a downside: long items like coats, shirts, and foul weather gear cannot be hung. I've tried to think of alternative locations to built a long cupboard but I haven't come up with a feasible solution that doesn't require gutting the boat (once again). By the way, the frames around the opening are made of iroko battens which, when varnished, match the surrounding woodwork pretty well.
Nicholas |
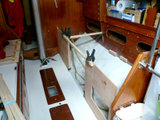
Dear Balladeers, I am looking at buying a cockpit tent / bimini to increase our cruising range in both cold and warm climates, and may also replace the sprayhood in the process as ours is getting a bit threadbare. There are all sorts of combinations possible, but ideally we would want a full cockpit tent that converts in some way to a bimini, either by unzipping or rolling up. Does anyone have a used one in fair condition they want to sell in the UK? Also any comments about suppliers of new ones welcome. Regards, Cameron Cracklin Rosie #73 | | Having experienced first-hand the comfort and functionality of the dinette in my Swedish friend Mats’s Albin Ballad Taifun, I decided to go ahead and gut the starboard side settee in order to do the same on Moments of Clarity. The material I used was mainly 10mm & 12mm marine ply, while the trimming was made from teak-tinted oak slats that I had found in the garbage last year. Also, I was lucky enough to be able to match the original tint of the Ballad interior with a paint I found in Dulux's paint catalogue. The paint I used was exterior grade satin acrylic--easy on the eyes and to clean.
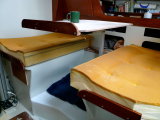
The photos are mostly self-explanatory but a few comments may be useful: 1) The storage space below the seats has increased enormously—although I had to substitute the starboard side 100-litre flexible water tank with a 50-litre one as the length of the original could not be accommodated under the forward seat. 2) Now, two people can dine in great comfort without having to deal with the big original table. I constructed a folding table that measures 50 x 65 while folded and can open up to 110 x 65, effectively reaching the port settee, if more people need to be accommodated. In the latter form, it can be used as a huge chart table while in port. In either form, it can also be used as an extra working space while preparing a meal. 3) The increased height of the seats allows one to look straight out the windows; it’s not really a deck saloon view but you can have a nice look at your surroundings while at anchor. 4) Although this is not an option I took, if need be, the table can be designed to be dropped level with the seats and, with the addition of a cushion, the dinette could be converted into an almost double bed (OK, for a really loving couple).
I used the dinette throughout last week’s cruise and I don’t know how I’d managed without it. Eating, reading and working on my laptop have become even more enjoyable and I can’t wait to use it when the weather turns foul towards the end of the year. Even in the middle of a Greek summer, the dinette arrangement offers an escape from the scorching midday sun.
Nicholas
|
| | Hi to all.
I'm starting this thread with some preliminary photos of a dinette that a Swedish friend is currently finishing. Mats Wik is the owner of "Taifun", Ballad hull# 911, and has been living aboard his boat for six years, the last two in Greece. He and I have been talking about the advantages of a dinette for the last six months and after trying out his--even in this unfinished form--I've become a fan. As you can see from the photos, the original seating position has been elevated (seat base to floor is 62cm) and has been extended, almost reaching the mast wall. He has also built an in-hull, 40-litre water tank between the seats. The storage space below the seats is enormous. The table drops in between the seats and creates a nice double bed (well, almost). Mats has opted for a lagoon table which can be swung around and can also be used in the cockpit. Even so, his table doesn't wobble like the original Ballad table. But the greatest part of all is that, with the elevated seating position, you can enjoy a drink or a meal with a view of the world outside. Having tried Mats's version, I'm now in the first stage of constructing a dinette on "Moments of Clarity". The starboard side berth has already been removed and the interior of the hull has been prepared for the epoxying of the mini bulkheads. Although Mats has laminated his contruction all around, on both sides, my plan is not to go to such extremes. Also, his Ballad is the version without the outboard berths so he had a bit more space to play with than I do. For me, a double berth will be almost impossible to achieve. On the other hand, I plan to have a bigger table (around 70x90, enough for a whole Imray chart) which will also be solid enough to hold on to at sea. In general, I've seen nice dinettes on boats both shorter and slimmer than the Ballad (Great Dane 28, Countess 28, Shipman 28) and they work great--at least if you're into cruising, cooking and breeze-shooting like I am. I'll keep you posted. In the meantime, ideas and comments are welcome.
Nicholas |
| | I wanted to create some extra storage space in the forecabin in order to be able to store a portable generator. Obviously, the extra space that was created can be used for storing various objects. From the photos you'll notice that I actually created two spaces, one for bigger items (e.g. generator) and the other for shoes, etc. This involved making a mini bulkhead plus two lids/bases. The former slides in between the forecabin bulkheads and the lids/bases sit on wooden supports that were epoxied to the sides. The whole thing can be removed but can also be laminated in place for a more permanent installation. |
Hi Friends! I have been asked why pictures don't show here on Multiply, and where to find something on the double berth that was once described on Ballad Exchange. I don't really know what has happened to alle the pictures we don't see anymore in many postings, but Multiply offers endless amount of space for images, while at the same time deleting images after a couple of months. I don't know if deletion is only done when images are uploaded in full filesize for printing, that might be the case, and then maybe many of our pictures from the old MSN Groups forum where transferred as such????? Personally I am not happy with Multiply. The double berth however was my own creation, and I will post all the pictures of it I can find, rigth here right now. Unfortunately I can't find all the pictures I made back then, so I cannot show how the double berth is actually made, only wh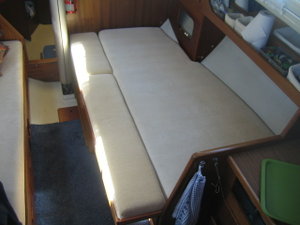 at it looks like. at it looks like. The side panel is removed, and cut i two. The forward part is put back on, the aft part is reinforced with a beam at the bottom, and made to be easily removed. An extra sheet of plywood is made to be pulled out to extend the bottom. But this was all so nicely photographed and illustrated. it's really sad it cant be found anymore. I couldn't find it, can someone else? 
Aemilia's interior is in need for revarnishing. Now most of the interior's woodwork of the Ballad is made of pretty thin veneer, which I don't want to destroy! However to do it right it should I gues I should start with a bare wood sufface. Has anybody any usefull sugestions how to do this right? Also I want a satin interior finish in the end (so no high gloss!). Which varnish should I use?
Any suggestions from fellow Ballad owners would be appreciated. Many thanks!
Frans
Aemilia 3 - Ballad 978 The inner lining for the hull is peeling away from the hull in the forepeak and the starboard pilot berth, perhaps caused by dampness and bouncing across waves this summer.
The lining has defied all attempts so far to restick it, including double sided carpet tape and elephant tape. The back was evidently a type of foam originally, which has decayed into a revolting slime which gets everywhere. It is possible to vacuum it off to some extent, but this doesnt seem to help much in sticking it back up.
I see from photos on the group that others have removed the lining. Does anyone have any ideas about how to put it back up in one easy step. Unfortunately there are more pressing other issues and I do not relish a major stripdown. In particular any ideas on how to remove the mess (mixture of old glue and the foam backing) and any recomended glues for relining
Any ideas welcome
Cracklin' Rosie #73
One of the nice features of our Ballad when I bought it four years ago was an array of brand new electronic instruments. They ranged from a chartplotter and multi-function wind and depth instruments to a fish finder. They certainly add to the convenience and safety of sailing, and we have enjoyed them, perhaps more than we should. The trade off has been that our experience in the cabin down below has been marred by the unsightly holes cut in the bulkhead and a rat’s nest of wires draped over the chart table. After a considerable amount of procrastination and reflection I began to craft a multi-purpose solution to this corner of the cabin. It started with a paper template taped to the bulkhead (after the instruments were temporarily removed) which allowed me to determine the exact shape and proportion of the space and ended in an organizational feat which is totally uncharacteristic of me. The result is a shallow frame which supports a panel screening the backs of the instruments, a rack for our binoculars and hand held VHF radio, a hidden wire chase to conceal the rat’s nest, and a handy place for writing implements and my often used dividers. The screening panel began as a nicely finished piece of wood to match the rest of the cabin but it evolved into a dry erase chalk board on which we post useful bits of information about tides and currents or reminders of things to do and buy. Before After Hello: Of the four or five Ballads that I have seen they all seem to have very flexible cabin soles or floor pans. There also seems to be a tendency for the sole to crack at hard spots where they attach to the hull or other support members as a result of the flexing. A lot of people use carpet or wood overlay to cover up the problem but I have had success recently in stiffening up the sole by squirting expanding foam into the crease between the under side of the sole and the hull. It is quick, cheap, and easy. The sole has much better support now with just a liitle bit of give and hopefully no tendency for future cracking. I have ground out the cracked areas and repaired them with fiberglass cloth and fairing compound. I recall that when I was shopping for a Ballad the condition of the cabin sole was one of the first flaws that I noticed. This fix may help maintain the long life and appeal of the Ballad. Tony Allport Pleiades #191 This message has been deleted by the author. Hi to all: With the boat taken apart while installing the heater, I decided to tackle another project which I'd had in mind for some time. Basically, I wanted to take advantage of the space under the port berth in the saloon, so with the base and back support removed I went to work. First, I cut the base in two (which made re-installation much easier) then I built two boxes whose dimensions are the entire length and width of the base and 7cm in height. This allows me to store nearly all my tools under the port settee, along with various boxes with screws, electrical supplies and the like, while leaving the drawers free for other items. This alteration is easier if your Ballad is the version with the narrow settees, where the back supports swing downward to create a wider berth. However, it should also be straightforward to do in the other version as well. The photos should be self-explanatory. Bunk base removed. New base with exta space. Extra space being put to good use. More stuff added and bunk base positioned and hinged Base in horizontal position awaiting cushions and lids for the outboard storage space. While waiting for Moments of Clarity to dry before being epoxied and anti-fouled, I decided to turn my attention to the plumbing. Phase 1 of the project involved the installation of a holding tank. Rather than going through the expense of having one custom-fabricated, I decided to get a ready-made 40-litre tank from Vetus which came with all the fittings and, fortunately, fit the space above the toilet. Placing the holding tank above the waterline has the advantage that it can be emptied by gravity, rather than with a separate pump.To secure the tank, I made a box out of 15mm plywood, which was epoxied, then given three coats of white bilge paint. The box sits on the original wooden rails, which were further supported by teak blocks. As the next phase would be the reduction (from 5 to 3) and renewal of all seacocks and through-hulls, I bought a 1½ inch and two ¾ inch Marelon structural composite (hence, electrolysis-free) seacocks, which have flanges that allow them to be either through-bolted to the hull or screwed on a backing pad laminated to the hull. As you can see from the photos, I chose an in-between solution, because I didn't want to make any more holes in the hull. The seawater through-hull is under the sink and is teed-off, with one hose going forward to the toilet and the other to the engine water filter. The distance to the engine is now even shorter (good) and to the toilet longer (this has made no difference in the pumping effort). The old holes, including the engineâs through-hull in the bilge, were plugged with epoxy/ colloidal silica mixture and glassed over with epoxied plywood pads. Incidentally, the boat was launched last Friday and was pronounced leak-free. The attached photos should be self-explanatory. -Nicholas Moments of Clarity #334 
The toilet, toilet base and sink are removed. The toilet discharge seacock in the photo was also cut off with a grinder (much easier than trying to unscrew it). The inside of the hull had been spot-painted in the past, so was sanded lightly and given three boats of International's bilge paint. The fresh water pump stayed in place, which I think is ideal, as it services the two extra flexible tanks under the settees and the original in the bow. 
Here, the holding tank is temporarily placed on two pieces of plywood to check for dimensions. Note the hole left from the removal of the discharge seacock.  
This a 15mm plywood disc. This side will be laminated to the hull, so the bolt holes are indented (note the special drill bit on the bench). Bolts with hexagon heads are chosen, since the cured epoxy will make them impossible to turn while tightening the nuts on the other side. 
This is the 1 1/2 inch seacock temporarily mounted on the disc to check for the accuracy of the holes. Then, the seacock is removed, the disc is epoxied to the hull over the old hole, with bolts in place and, when ithe epoxy has cured, the disc is lightly abraded and painted. With these types of seacocks, the body of the seacock is mounted first, then the through-hull is screwed in from the outside of the boat.  
This is the end result with all hoses in place. In the left photo, you will notice the loop in the saltwater intake--essential if the toilet is mounted below the waterline. The discharge hose from the toilet is routed behind the tank to the top of the tank and is secured to a 90-degree fitting. The tank discharge hose exits from the bottom of the tank and goes straight to the seacock. The holding tank is secured with webbing straps. (I haven't installed the no-smell filter and breathing hose yet. ) In the right photo, you can see the mounted seacock onto which the hose is double-clipped.  
Now, to the sink. This is the area under the sink before the project started. In the right photo, the wire basket, the hoses and the fridge compressor have been removed. Again, the old seacocks were cut off. 
After five weekends, this is what it looks like (minus the sink). The seacocks were mounted in a manner similar to the toilet's. The fridge compressor was given a strurdier base and a new, larger accumulator tank was installed to cut down on pump wear. The foot pump was removed and may be re-installed in the future. 
This is another view, through the side opening. Hello, Just become the owner of Cracklin' Rosie, 1973 model and have been told by Insurance company that we need to make alterations to Gas layout (probably needs to have its own sealed locker). Has anybody done a similar convertion? Also we are adding battery isolation switch, but batteries currently located in saloon bilges. Is this standard? Any other suggestions? Is it desirable to move them? Thanks! Cracklin' Rosie Hi there: Iâve moved this subject to the Technical Section/ Accommodation so that itâs easier for people to follow. I believe, it will generate a lot of comments. My original LPG installation was very rudimentary, almost like an accident waiting to happen. So, a few years ago, I built a box out or marine plywood, which I epoxied, painted and bolted to the aft platform. The box has a metal nipple on the bottom which directs overboard. The gas regulator is manifolded into two oulets—one for the rail-mounted barbecue and one for the galley stove. For the latter, the flexible gas pipe exits the box and enters the deck through waterproof glands and runs through electrical conduit all the way to about 40cm of the stove. That way, it is totally protected and nothing can rub against it. Also, when I use the stove, I make sure to switch off the supply at the regulator while the stove is still on, so as to make sure no gas remains in the pipe. This is a bit of a belt-and-braces approach but with LPG you can never be too careful. Unfortunately, I don’t have detailed photos of my installation, just a fuzzy photo of the box and another one of the electrical conduit through which the pipe runs to the stove. However, I can post some detailed photos soon since the pipe has to be renewed anyway. Nicholas Moments of Clarity hull# 334 
LPG tank box 
Protected gas pipe Here is a link to a misplaced posting on aircondition: CLICK. I also have a question: What happens to the compressor in the bilge, if the bilge runs full of water? The pictures of the aircondition posting were posted in the photo album. It's easier to to understand a posting if the pictures illustrating it are posted inside the posting, so here is a little guide that might inspire anybody with pictures illustrating a technical issue.: Jesper Milling Hi to all: Having spent a lot of time looking at interior photos of Ballads in our forum, I’ve taken a liking to the version without the outboard berths. It may provide less stowage than the layout in Moments of Clarity but the settees are wider providing close to the sofa-like comfort one enjoys at home. Mine, on the other hand, offer all the comforts of a church bench. One night, while I was sitting in my IKEA armchair at home reading a book, I started thinking of how nice it would be if I could do the same in Moments of Clarity. So, at the bewilderment of my girlfriend, out came the tape measure, then the jigsaw. The alteration and installation were very simple and now I can recline in comfort, read the Sunday papers, sip a drink or even take a nap, as if I was aboard a Hallberg-Rassy 54. Although they certainly take up more space than the original arrangement—and I’m minus one berth—it hasn’t created a problem and, more importantly, access to stowage remains the same. Also, all it takes to reduce them to easily-stored pieces is six screws, since IKEA designed them to be shipped plat-packed. Nicholas “Moments of Clarity” #334 The original set-up. One can easily imagine how uncomfortable it was. Cushions and back are removed The donor chairs were cut at the yellow line. The spare wood will be used to make other nice bits and pieces. Top arrow: The sawn edges were given two coats of teak-tinted varnish. Bottom arrow: Legs were made from off-cuts to retain the chairs’ natural incline. Comfort-wise, this makes all the difference. The frames were through-bolted to the settee base with cart bolts… …which have a domed head and don’t threaten the flexible water tank that’s installed underneath. Because of their slatted backs, the chairs don’t impede access to the stowage behind. Here they await cushions and owner. Yes, they’re just as comfortable as they look. Ahh! A happy owner catches up on the latest boating news. Hello Ballad owners, I think that a good cockpit table has to be easy to install (and uninstall), in a short lap of time and it also has to be storable easily. The owner from who I bought my Ballad last year has made a very nice cockpit table and I tought that it was interesting to share the concept with you. The table is set on the tiller so we can move it when necessary, to stand up or to have access to the cockpit chest, for example. Here some pictures : The black metal piece is the anchorage for my autopilot. It take seconds to install and it fit easily in my cockpit chest. Pat. Lumina, Ballad #819 Hello If anyone has installed a pressurized water system I would appreciate comments. Thanks Gary I have a two burner, Origo stove on my Ballad. The advantages are the relative safety and simplicity of an alcohol stove compared with gas, light weight, no need for cumbersome gas cylinders taking up cockpit locker space, and there is space to store pots and pans in the cupboard below the stove.
The disadvantages are the absence of a grill and oven and the problem of fumes from methylated spirits (this is the form of alcohol sold in UK hardware stores and I think is predominately ethyl alcohol with some methyl alcohol added. I think this is to make it unpleasant to drink. Unfortunately the meths seems to have a variable but definite tendency to produce fumes compared to the pure ethyl alcohol that I have used and is available in other countries in Europe.
Is there anyway round this without having to dash across the channel and stock up with pure ethyl alcohol? And another thought, does anyone in the discussion group use a paraffin stove or diesel stove?
David
| |