Rebuilding rudder and hatch lids

Post Reply
Bob McGovern
Posts: 287
Joined: Fri Oct 26, 2012 3:08 am
Location: Wyoming, USA

Rebuilding rudder and hatch lids

Post by Bob McGovern »

Since it is winter now and we are too wiped out from the purchase to pursue big projects, we want to start with smaller, indoor stuff. First up is the rudder. It was full of water, which was starting to push out thru the laminate & cause blisters.

Image

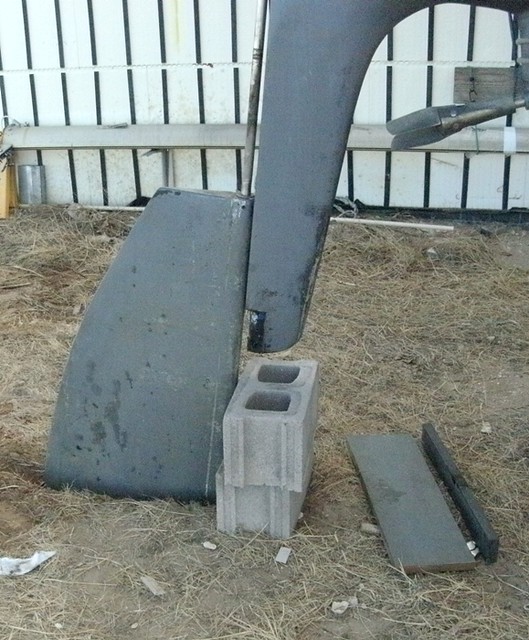
That's probably a metaphor for owning an old sailboat: you've dug yourself a deep hole, but it must get deeper still before you are finished. ;) There are several ways to go at this. some people make molds, some take templates off the old rudder; some start with a foam core and build up from scratch. This rudder looks decent enough, we decided to split it open like a clam, rework the guts, then glue it back together. A multitool (like Fein) is really helpful if you want to be surgical in splitting the shell. If you've never seen the inside, ours looks like this:

Image

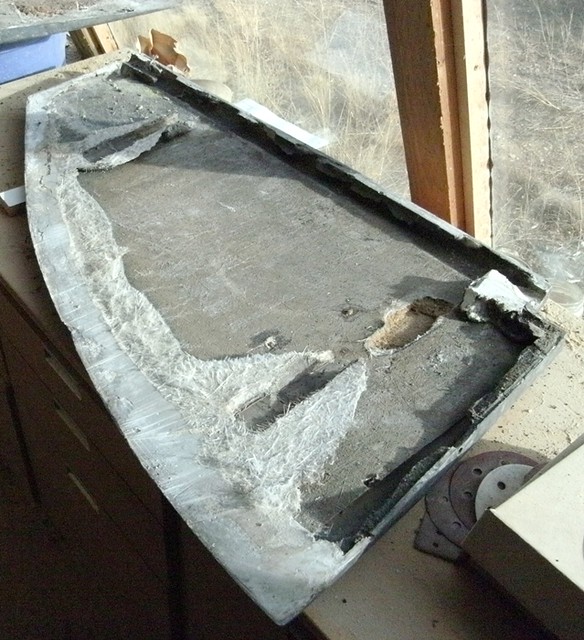
That's 3/8" foam (like CoreCell) on the inside of each rudder half, with one crude layer of matting formed over it using polyester resin. The space between the layups is mostly empty. And of course, water eventually gets in there. Our blade showed several generations of attempted fixes, including MarineTex bedding around the shaft and yellow squirt foam injected into the top of the cavity. They didn't help, much.

First stage of the cleanup: removing the inner skin and saturated foam. Again, a multitool is the business for controlled destruction.

Image

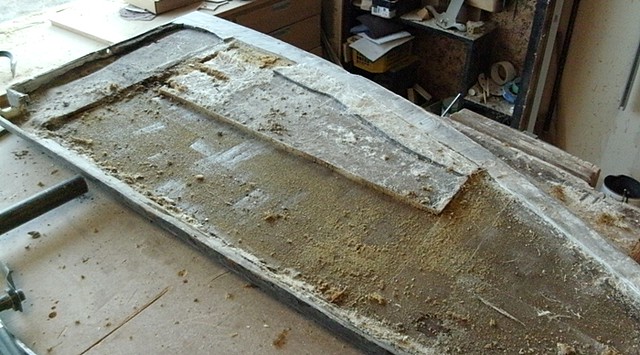
We plan to scrape it to raw laminate, then give the shell a couple weeks in the sun to drive all the water out of it. Then I will start rebuilding it. Plan is a layer of 4oz fabric epoxied to the inside face; then build up bedding for the stock (we will weld on three more flanges); then fill each half with expanding closed-cell foam & shave it flush; then epoxy the two halves together. The whole assembly will then be ground down, skinned in 6oz cloth, faired, and painted.

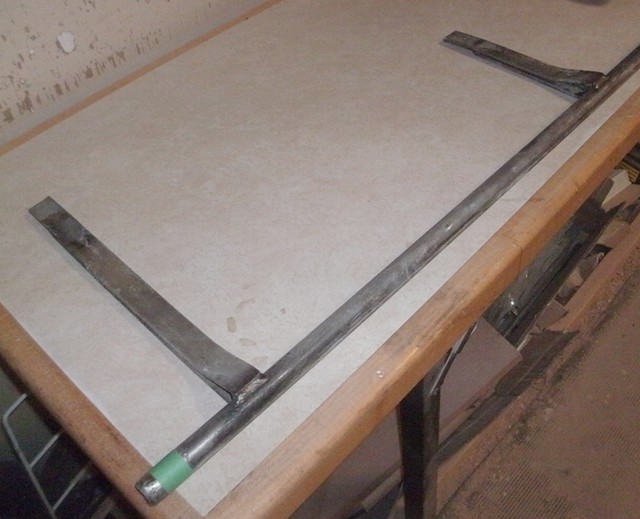
Here's the stock. Needs more flanges. There are a few shallow grooves worn where the shaft has turned against various bushings; should we start with a new piece of steel, or just reuse this one?

Image
admin
Site Admin
Posts: 3
Joined: Sun Sep 30, 2012 7:51 pm

Re: Rebuilding rudder and hatch lids

Post by admin »

Hi
I did the same project 10 years ago. First I took away all topcoat. Then I made a line 5 cm from the edge to be usee to rebuild it to the same shape afterwards.
IMG_0895.JPG
IMG_0895.JPG (524.34 KiB) Viewed 16723 times
I kept the stock as is, I only placed some GRP between the flanges when I glued it together with epoxy to prevent them to bend when under stress.
Finally I rebuilt it back to shape with glassfiber and epoxy around the edges, and painted it with pure epoxy several times.
IMG_1023.JPG
IMG_1023.JPG (516.13 KiB) Viewed 16723 times
I've had no water in it since I did this...
Good luck with your rudder!
/Peter
/Peter
Bob McGovern
Posts: 287
Joined: Fri Oct 26, 2012 3:08 am
Location: Wyoming, USA

Re: Rebuilding rudder and hatch lids

Post by Bob McGovern »

Ooh, nice work, Peter. What did you use to create a watertight seal where the shaft enters and exits the blade? That seems to be the source point for most leaks. I am currently leaning toward G/Flex or similar flexible epoxy, maybe leaving a little recess for some 3M 5200 polyurethane on top of that. The problem is that most resin-based products don't adhere to polished stainless steel very well. Sooner or later, the bond at the shaft loses watertightness. I'm hoping a filet of polyurethane sealant will add another layer of defense.

The other thing that needs attention is rudder stops. You can see in my first photo a light-colored line near the front of the blade where the rudder has repeatedly jammed against the skeg. That's hard on the rudder and on the skeg. I think we should clamp an armature to the shaft, inside the boat, and arrange some wooden or hard rubber stop-blocks to limit rudder swing. But our rudder shaft doesn't use a stuffing box -- just a tall length of radiator hose. We may need to add a stuffing box.

Extra advantage of having such an armature: you could attach a below-deck autopilot ram to it. :mrgreen:
peterohman
Posts: 24
Joined: Sun Sep 30, 2012 8:24 pm

Re: Rebuilding rudder and hatch lids

Post by peterohman »

I just made the hole where the stock exits larger the first centimeter, and filled this with epoxy. Since I've locked the flanges from flexing, I assumed the stock would not move enough to break the epoxy, an so far this has been correct...
/Peter
MarkRyan1981
Posts: 165
Joined: Fri Oct 12, 2012 7:47 am

Re: Rebuilding rudder and hatch lids

Post by MarkRyan1981 »

Did you add more flanges to the stock in the end Bob? Did you reuse the current stock or replace it entirely? What did you do to prevent the rudder jamming against the skeg (mine suffers from this too)?

:D Looks like a cracking job, one I must tackle as my rudder is full of water (spends a good hour dribbling out after I haul out for the winter)
Bob McGovern
Posts: 287
Joined: Fri Oct 26, 2012 3:08 am
Location: Wyoming, USA

Re: Rebuilding rudder and hatch lids

Post by Bob McGovern »

MarkRyan1981 wrote:Did you add more flanges to the stock in the end Bob? Did you reuse the current stock or replace it entirely? What did you do to prevent the rudder jamming against the skeg (mine suffers from this too)?

:D Looks like a cracking job, one I must tackle as my rudder is full of water (spends a good hour dribbling out after I haul out for the winter)
Hoo. We're nowhere on the rudder, Mark. Nowhere on the boat, frankly -- 70 hour work weeks, forty degree weather. :cry: But soon! I want two more tabs welded to the stock; need to find a good local stainless welder. Not so many around here. Everybody in Wyoming can weld mild steel -- heck, I can weld mild steel -- but SS is another matter. A fellow named Big Pete might be the best choice, but there's a reason he has two mint-fresh Cadillacs parked in his garage.... 'Proud of his work,' as the saying goes.;)

We plan to use the current stock & replace the Bakelite bushings/bearings with UHMW. Our Ballad has no rudder stuffing box, just a tall radiator hose standing above waterline. I'm thinking a clamp-on 'tiller' arm below deck might serve as a rudder stop.

http://www.boatdesigns.com/Tiller-Arms/products/105/

We could glue some rubber-faced blocks under the cockpit to limit travel. FRP crunching against FRP is never a happy thing & must place high stress on both skeg and rudder. If we arrange things right, we may even be able to use the tiller arm for a below-decks autopilot!

So current thinking is extra flanges on the shaft; 16#/cuft expanding foam inside the rudder (very dense, very closed-cell); G/Flex epoxy where the shaft enters and exits; and two removable bungs on the rudder bottom to drain any water that does get in. Whole thing wrapped in biaxial fabric. Now all I need is some free time. :shock:
Post Reply